
-
Access Platform Hire
-
Scissor Lifts
-
 Skyjack 3219 - 7.8M Scissor Lift
-
Genie GS 2632 Scissor Lift - 7.9M Platform
-
Genie GS 2646 Scissor Lift - 9.9M Working Height
-
Skyjack 4632 - 11.75M Scissor Lift
-
Stabiliser/ Outrigger Foot Pads 300mm x 300mm 9t Capacity
-
BoSS X3X 5.2M Scissor Lift
-
Genie GS 4047 - 13.7M Scissor Lift
-
Scissor Lift Rough Terrain Diesel - S2755RT 8.1m (27ft) Platform
-
Scissor Lift - AS1413E 13.8m (45ft) Platform
-
JCPT2212DC 22m Large Scissor Lift
-
-
Boom Lifts
-
Niftylift 120T - 12M Trailer Mounted Cherry Picker
-
Niftylift 170 - 17M Trailer Mounted Boom Lift
-
Niftylift HR12 - 12M Self Propelled Boom Lift
-
Stabiliser/ Outrigger Foot Pads 300mm x 300mm 9t Capacity
-
Niftylift SD120T 4x4 - 12.65M Self Drive Platform
-
Niftylift HR15 4x4 - 15.7M Self Propelled Boom Lift
-
Niftylift HR17 Hybrid 4x4 - 17.2M Self Propelled Boom Lift
-
Niftylift HR21 4X4 - 20.8M Self Propelled Cherry Picker
-
Niftylift HR17E | 17.2m Self Propelled
-
- Spider Lifts
- Low Level Access Platforms
- Vertical Masts
-
Scissor Lifts
-
Access Tower & Support
-
Ladders & Steps
-
Ladder - Double 4.00 to 6.00 Metre
-
Ladder - Double 5.00 to 9.00 Metre
-
Ladder - Roof Ladder Extending 3.9 to 6.6 Metre
-
Ladder - Safety Foot
-
Ladder - Stand Off
-
Step Ladder - 6 Tread Fibreglass Steps 1.65m Open
-
Step Ladder - 10 Tread Fibreglass Steps 2.74m Open
-
Step Ladder - 6 Tread, 4ft 9" Open
-
Step Ladder - 10 Tread, Platform 8ft
-
Step Ladder - 12 Tread, Platform 9ft 7"
-
Ladder - Combi Ladder - 2.45 to 5.80m Extended
-
Ladder - Combi Ladder - 3.00 to 6.90m Extended
-
- Scaffold Towers & Podium Steps
- Trestles Boards & Supports
-
Ladders & Steps
-
Breaking & Drilling
-
Breakers
-
Breaker - Hydraulic
-
Impact Wrench - Hilti SIW 22A
-
SDS Hammer Drill - Hilti TE 6 36A
-
10 KG Combihammer TE 80-ATC
-
Light Demolition Hammer TE 500
-
Medium Demolition Hammer TE 700
-
Heavy Demolition Hammer TE 1000
-
Heavy Demolition Hammer TE 3000
-
Concrete Demolition Hammer - TE 2000-AVR
-
Hydraulic Breaker SB102
-
- Diamond Drilling
- Drills & Portable Milling Machines
- Cordless Drills and Rotary Hammers
-
Breakers
-
Cleaning & Floorcare
- Floor Cleaning
- Pressure Washer Hire & Patio Cleaners
- Vacuums & Dust Extractors
-
Compaction Equipment
- Rollers
- Compacting Plates
-
Concrete Equipment
-
Mixer - Concrete Mixer 4/3 Tip Up - 240v
-
Float - Big Blue Glider Float
-
Mixer - Concrete Mixer 4/3 Tip Up - 110v
-
Mixer - Concrete Mixer 4/3 Tip Up - Petrol
-
Float - Easy Float
-
Float - Power Float
-
Poker Vibrator - Petrol
-
Poker Vibrator - Electric
-
Beam Screed - Vibrating Screeder Unit
-
Beam Screed - Aluminium Beam Set
-
Pump - Submersible 50mm (2") c/w 5m Flexible Drive
-
Impact Wrench - Hilti SIW 22A
-
10 KG Combihammer TE 80-ATC
-
-
Cutting & Grinding
-
Power Cutter - 300mm (12") Petrol
-
Floor Saw - 450mm (18")
-
Saw - Masonry Sawbench 350mm (14") Petrol
-
Diamond Blade Hire & Sale
-
Block Splitter
-
Cordless Angle Grinder - Hilti AG125 22A
-
Cordless Angle Grinder - Hilti AG 150-A36
-
Diamond Power Cutter, Hilti DCH 300
-
Diamond Grinder DG 150 + DPC 120
-
Power Conditioner DPC 120
-
Angle Grinder AG 115-7D
-
Angle Grinder AG 125-15DB
-
Angle Grinder AG 230-24D
-


 Platform")
 Platform")


")
")
")
")
")


 c/w 5m Flexible Drive")
 Petrol")
")
 Petrol")


-
Decorating & Site Equipment
- Compressors
- Decorating Equipment
- Fencing & Barriers
- Hand Tools & Miscellaneous items
- Surveying & Measuring
- Tile Saws
- Dehumidifiers, Drying and Flood Restoration Equipment
- Diggers/ Dumpers/Trenchers
- Dust & Fume Extractors
- Floor Sanding Equipment
- Flooring & Surface Preparation Equipment Hire
-
Gardening and Landscaping
- Ground Clearance, Preparation & Fencing Equip.
- Lawncare
- Hedge and Tree Maintenance


 2m Section")


")

")
")


- Generator Hire
-
Heaters
- Heaters - Direct Fired Gas
- Heaters - Electric
- Heaters - Indirect Fired Gas & Oil
-
Hilti Hire
- Batteries/Chargers
-
Cordless Innovation
-
Cordless Hammer Drill Driver - Hilti SF 6-A22
-
Impact Driver - Hilti SID 4-A22
-
Impact Wrench - Hilti SIW 22A
-
Cordless Angle Grinder - Hilti AG125 22A
-
Cordless Reciprocating Saw - Hilti WSR 22-A
-
SDS Hammer Drill - Hilti TE 6 36A
-
Cordless Angle Grinder - Hilti AG 150-A36
-
Cordless Combihammer - Hilti TE 30 36A
-
Li-ion Battery - Hilti Battery 22v 5.2 Ah
-
Li-ion Battery - Hilti Battery 36V 5.2 Ah
-
Battery Charger - Hilti Charger 4/36-350 230v
-
- Cutting and Grinding
- Diamond Systems
- Direct Fastening
-
Drilling/Demolition
-
Cordless Hammer Drill Driver - Hilti SF 6-A22
-
Impact Driver - Hilti SID 4-A22
-
Impact Wrench - Hilti SIW 22A
-
SDS Hammer Drill - Hilti TE 6 36A
-
Cordless Combihammer - Hilti TE 30 36A
-
3KG Rotary Hammer TE7-C
-
4KG Combihammer TE 30
-
10 KG Combihammer TE 80-ATC
-
Light Demolition Hammer TE 500
-
Medium Demolition Hammer TE 700
-
Heavy Demolition Hammer TE 1000
-
Heavy Demolition Hammer TE 3000
-
Concrete Demolition Hammer - TE 2000-AVR
-
- Dust Extraction
- Rotating Lasers
- Sanders
-
Lifting, pulling
-
Cobra Reel/ Duct Rod
-
Mobile Gantry - 2 Tonne Lifting Capacity
-
Scaffold Hoist 150kg
-
Block & Tackle
-
Engine Hoist
-
Skates - Shifting Skates - 16 Tonne Capacity
-
Jack - Toe Jack 5000kg Capacity
-
Pallet Truck - 2.5 Tonne Capacity
-
Brick Basket
-
Genie Superlift SLA-10
-
Genie Superlift SLA-15
-
Genie Superlift SLA-25
-
Genie Superlift Fork Extensions
-
Panel Lift
-
-
Lighting/Power/Welding
-
Lights Cables & Distribution
-
Distribution Box - 63amp
-
RCD Circuit Breaker
-
Floodlight - 2 x 30w LED on Stand
-
Junction Box - 4 Way 110v
-
Light - Plasterers Light
-
Transformer - 3.3kva Power Tool
-
Transformer - 5.0kva Power Tool
-
Armoured Cable - 63amp
-
Distribution Box - 13amp Satellite
-
Distribution Box - 13amp Satellite Dimmer
-
Transformer - 3.0kva Continuous Vented
-
Extension Lead
-
Distribution Box - 32amp
-
Light - 30w LED Floodlight on Stand
-
- Welding Equipment
- Generator Hire
-
Lights Cables & Distribution
- Pumps & Plumbing
- Sanders & Saws


")
")
")


")


 Pump c/w 1 Length Hose + Clip")
 c/w 1 Length Hose + Clip")
")

 Full range
 Plant Sales
 Plant Hire
 Careers at Plantool
Find your nearest branch
Categories
- Access Platform Hire
- Access Tower & Support
- Breaking & Drilling
- Cleaning & Floorcare
- Concrete & Compaction Equipment
- Cutting & Grinding
- Decorating & Site Equipment
- Dehumidifiers, Drying and Flood Restoration Equipment
- Diggers/ Dumpers/Trenchers
- Dust & Fume Extractors
- Flooring & Surface Preparation Equipment Hire
- Gardening and Landscaping
- Heaters
- Hilti Hire
- Lifting, pulling
- Lighting/Power/Welding
- Pumps & Plumbing
- Sanders & Saws
- Full range
- Plant Sales
- Plant Hire
-
Powered Access Hire Locations
- Powered Access Hire Hinckley
- Powered Access Hire Wellingborough
- Powered Access Hire Rugby
- Powered Access Hire Leicester
- Powered Access Hire Coventry
- Powered Access Hire Northampton
- Powered Access Hire Solihull
- Powered Access Hire Redditch
- Powered Access Hire Market Harborough
- Powered Access Hire Birmingham
- Powered Access Hire Dudley
- Powered Access Hire Walsall
- Powered Access Hire Wolverhampton
- Powered Access Hire Peterborough
- Powered Access Hire Blaby
- Powered Access Hire Corby
- Powered Access Hire Leamington Spa
- Powered Access Hire Broughton Astley
- Powered Access Hire Exhall
- Powered Access Hire Rushden
- Powered Access Hire Wigston
- Powered Access Hire Bedworth
- Powered Access Hire Oadby
- Powered Access Hire Kenilworth
- Powered Access Hire Desborough
- Powered Access Hire Knowle
- Powered Access Hire Atherstone
- Powered Access Hire Enderby
- Powered Access Hire Southam
- Powered Access Hire Daventry
- Powered Access Hire Warwick
- Powered Access Hire Kettering
- Powered Access Hire Stratford-upon-Avon
- Powered Access Hire Lutterworth
- Powered Access Hire Nuneaton
- Powered Access Hire Irthlingborough
- Powered Access Hire Alcester
- Powered Access Hire Thrapston
- Powered Access Hire Coleshill
- Powered Access Hire Balsall Common
- Powered Access Hire Earls Barton
- Powered Access Hire Towcester
- Powered Access Hire Raunds
- Powered Access Hire Ibstock
- Powered Access Hire Studley
- Powered Access Hire Shipston on Stour
-
Access Tower & Support Hire Locations
- Access Tower & Support Hire Hinckley
- Access Tower & Support Hire Wellingborough
- Access Tower & Support Hire Rugby
- Access Tower & Support Hire Leicester
- Access Tower & Support Hire Coventry
- Access Tower & Support Hire Northampton
- Access Tower & Support Hire Solihull
- Access Tower & Support Hire Redditch
- Access Tower & Support Hire Market Harborough
- Access Tower & Support Hire Birmingham
- Access Tower & Support Hire Dudley
- Access Tower & Support Hire Walsall
- Access Tower & Support Hire Wolverhampton
- Access Tower & Support Hire Peterborough
- Access Tower & Support Hire Blaby
- Access Tower & Support Hire Corby
-
Plant Hire Locations
-
Concrete Crusher Hire Locations
- Concrete Crusher Hire Daventry
- Concrete Crusher Hire Warwick
- Concrete Crusher Hire Kettering
- Concrete Crusher Hire Stratford upon Avon
- Concrete Crusher Hire Lutterworth
- Concrete Crusher Hire Birmingham
- Concrete Crusher Hire Dudley
- Concrete Crusher Hire Walsall
- Concrete Crusher Hire Wolverhampton
- Concrete Crusher Hire Peterborough
- Concrete Crusher Hire Blaby
- Concrete Crusher Hire Corby
- Concrete Crusher Hire Leamington Spa
- Concrete Crusher Hire Broughton Astley
- Concrete Crusher Hire Exhall
- Concrete Crusher Hire Leicester
- Concrete Crusher Hire Coventry
- Concrete Crusher Hire Northampton
- Concrete Crusher Hire Solihull
- Concrete Crusher Hire Rugby
- Concrete Crusher Hire Hinckley
- Concrete Crusher Hire Redditch
- Concrete Crusher Hire Wellingborough
- Concrete Crusher Hire Market Harborough
- Concrete Crusher Hire Rushden
- Concrete Crusher Hire Wigston
- Concrete Crusher Hire Bedworth
- Concrete Crusher Hire Oadby
- Concrete Crusher Hire Kenilworth
- Concrete Crusher Hire Desborough
- Concrete Crusher Hire Knowle
- Concrete Crusher Hire Atherstone
- Concrete Crusher Hire Irthlingborough
- Concrete Crusher Hire Balsall Common
- Concrete Crusher Hire Enderby
- Concrete Crusher Hire Southam
- Concrete Crusher Hire Alcester
- Concrete Crusher Hire Thrapston
- Concrete Crusher Hire Coleshill
- Concrete Crusher Hire Earls Barton
- Concrete Crusher Hire Towcester
- Concrete Crusher Hire Raunds
- Concrete Crusher Hire Ibstock
- Concrete Crusher Hire Studley
- Concrete Crusher Hire Shipston on Stour
- Concrete Crusher Hire Meriden
- Concrete Crusher Hire Crick
- Concrete Crusher Hire Attleborough
- Concrete Crusher Hire Wollaston
- Concrete Crusher Hire Staverton
- Concrete Crusher Hire Lowick
- Concrete Crusher Hire West Bromwich
- Concrete Crusher Hire Loughborough
- Concrete Crusher Hire Stourbridge
- Concrete Crusher Hire Halesowen
- Concrete Crusher Hire Smethwick
- Concrete Crusher Hire Willenhall
- Concrete Crusher Hire Kingswinford
- Concrete Crusher Hire Swadlincote
- Concrete Crusher Hire Tipton
- Concrete Crusher Hire Wednesbury
- Concrete Crusher Hire Coalville
- Concrete Crusher Hire Rowley Regis
- Concrete Crusher Hire Brierley Hill
- Concrete Crusher Hire Melton Mowbray
- Concrete Crusher Hire Oldbury
- Concrete Crusher Hire Stamford
- Concrete Crusher Hire Brackley
- Concrete Crusher Hire Shepshed
- Concrete Crusher Hire Birstall
- Concrete Crusher Hire Wombourne
- Concrete Crusher Hire Oakham
- Concrete Crusher Hire Castle Donington
- Concrete Crusher Hire Oundle
- Concrete Crusher Hire Kegworth
- Concrete Crusher Hire Silverstone
-
Mini Digger Hire Locations
- Mini Digger Hire Hinckley
- Mini Digger Hire Wellingborough
- Mini Digger Hire Rugby
- Mini Digger Hire Coventry
- Mini Digger Hire Northampton
- Mini Digger Hire Leicester
- Mini Digger Hire Solihull
- Mini Digger Hire Market Harborough
- Mini Digger Hire Redditch
- Mini Digger Hire Birmingham
- Mini Digger Hire Peterborough
- Mini Digger Hire Walsall
- Mini Digger Hire Wolverhampton
- Mini Digger Hire Dudley
- Mini Digger Hire Leamington Spa
- Mini Digger Hire Broughton Astley
- Mini Digger Hire Exhall
- Mini Digger Hire Blaby
- Mini Digger Hire Corby
- Mini Digger Hire Coalville
- Mini Digger Hire Swadlincote
- Mini Digger Hire Loughborough
- Mini Digger Hire Rushden
- Mini Digger Hire Bedworth
- Mini Digger Hire Wigston
- Mini Digger Hire Oadby
- Mini Digger Hire Kenilworth
- Mini Digger Hire Irthlingborough
- Mini Digger Hire Atherstone
- Mini Digger Hire Desborough
- Mini Digger Hire Alcester
- Mini Digger Hire Thrapston
- Mini Digger Hire Crick
- Mini Digger Hire Earls Barton
- Mini Digger Hire Enderby
- Mini Digger Hire Balsall Common
- Mini Digger Hire Knowle
- Mini Digger Hire Southam
- Mini Digger Hire Meriden
- Mini Digger Hire Coleshill
- Mini Digger Hire Daventry
- Mini Digger Hire Warwick
- Mini Digger Hire Kettering
- Mini Digger Hire Stratford-upon-Avon
- Mini Digger Hire Lutterworth
- Mini Digger Hire Nuneaton
-
Dumper Hire Locations
- Dumper Hire Hinckley
- Dumper Hire Nuneaton
- Dumper Hire Warwick
- Dumper Hire Lutterworth
- Dumper Hire Daventry
- Dumper Hire Kettering
- Dumper Hire Stratford-Upon-Avon
- Dumper Hire Coventry
- Dumper Hire Dudley
- Dumper Hire Leicester
- Dumper Hire Market Harborough
- Dumper Hire Northampton
- Dumper Hire Peterborough
- Dumper Hire Redditch
- Dumper Hire Rugby
- Dumper Hire Solihull
- Dumper Hire Walsall
- Dumper Hire Wellingborough
- Dumper Hire Wolverhampton
- Dumper Hire Blaby
- Dumper Hire Broughton Astley
- Dumper Hire Corby
- Dumper Hire Exhall
- Dumper Hire Leamington Spa
- Dumper Hire Alcester
- Dumper Hire Atherstone
- Dumper Hire Balsall Common
- Dumper Hire Bedworth
- Dumper Hire Burton Latimer
- Dumper Hire Coleshill
- Dumper Hire Crick
- Dumper Hire Desborough
- Dumper Hire Earls Barton
- Dumper Hire Enderby
- Dumper Hire Irthlingborough
- Dumper Hire Kenilworth
- Dumper Hire Knowle
- Dumper Hire Meriden
- Dumper Hire Oadby
- Dumper Hire Rushden
- Dumper Hire Southam
- Dumper Hire Thrapston
- Dumper Hire Wigston
- Dumper Hire Attleborough
- Dumper Hire Ibstock
- Dumper Hire Lowick
- Dumper Hire Raunds
- Dumper Hire Shipston on Stour
- Dumper Hire Staverton
- Dumper Hire Studley
- Dumper Hire Towcester
- Dumper Hire Wollaston
- Dumper Hire Coalville
- Dumper Hire Halesowen
- Dumper Hire Kingswinford
- Dumper Hire Loughborough
- Dumper Hire Rowley Regis
- Dumper Hire Smethwick
- Dumper Hire Stourbridge
- Dumper Hire Swadlincote
- Dumper Hire Tipton
- Dumper Hire Wednesbury
- Dumper Hire West Bromwich
- Dumper Hire Willenhall
- Dumper Hire Birmingham
-
Concrete Crusher Hire Locations

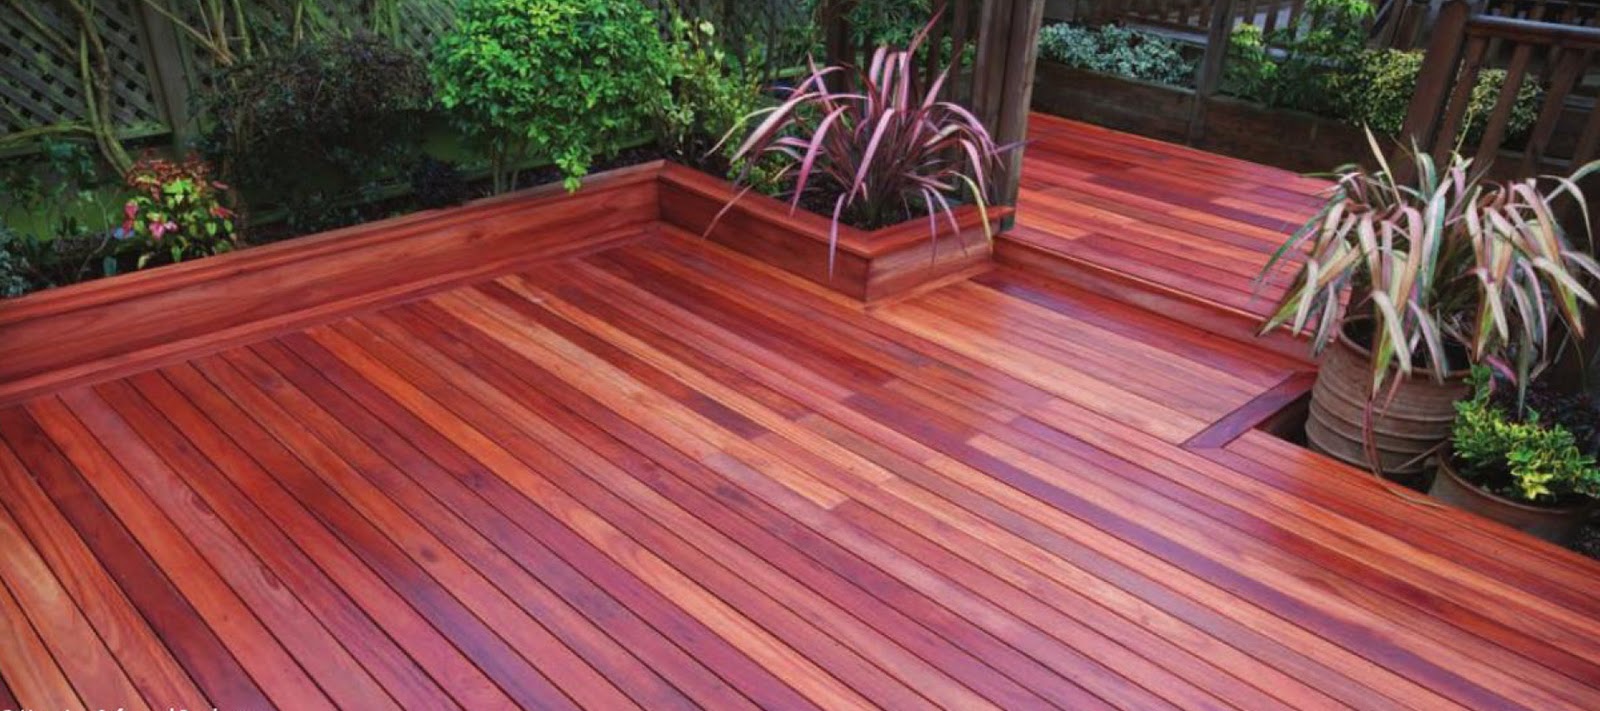
Build your own decking - the ultimate DIY landscaping project
For those who may have considered an outdoor decking area one of the leading considerations is usually cost, and little wonder given that this home improvement can easily reach the lofty budgetary heights of upwards of £1000.
Yet despite so many homeowners typically choosing to go to the professionals for such a service, building your own decking is surprisingly straight forward with the right instructions. With this in mind here we provide a step-by-step guide towards installing your own decking – simple, straight forward and with just enough detail.
Build your own decking: Step by Step
1. Prepare your site
Begin by cleaning out all vegetation, debris and trees that are currently upon the site where the decking will be (it is very important to avoid digging into any cables and drainage and using Cable & Pipe detector really helps to prevent that).
Next you should measure out the area using your deck plan (which should have been drawn up prior to so much as purchasing a single piece of decking); use pegs to place within the ground to mark off the decking corners.
If the area has grass down then you’ll need to dig this up and smooth over the left behind soil so that you have a flat surface to work with.
2. If the deck is to be connected to a building now is the time to attach the joists
If your decking is to attach to your building then you firstly need to be sure that it won’t be blocking any airbricks, nor disturbing any damp-proof course.
Next you should hold the joist against the masonry and then align the sub-frame to run alongside it. The holes within the joist should be placed with 400mm in-between them across the entire length of the joist, they should also be placed at the top and bottom in turns (this ensures no area of the joist is weakened).
Lastly you should ensure that the joist is completely level with a spirit level, following this by drilling the holes into the masonry and placing expanding masonry bolts (with washers) into the holes. Complete the process by ensuring that these are as tight as possible with the help of a spanner.
3. Check your decking area is square
Before you begin any structural work you need to ensure that the area is square (you should use the 3-4-5 triangle method to achieve this).
4. Add your support posts
Begin by digging holes that are 600mm deep for each of the joist support posts, these should be around 300mm in diameter at the top and 400mm at the bottom. Between each post there should be 1.2m. The corner posts should not sit right in the corner of the site, but should instead be slightly inset.
Having placed the post in the hole you should then check it’s completely level, hold it in position and pour in quick drying cement. Repeat this for each hole.
5. Build your joist sub-frame skeleton
Next you should attach an outer edge of joists, forming a square and fixing the joists first to each corner post with two countersunk coach screws, and then to one another at the corners with two countersunk coach screws once more. You can make this more secure by adding two parallel support beams to every other post (if you only have a three by three posts square, the support beam would be in the middle only).
Next you should add the inner joists, which should run in the opposite direction to the deck boards that you’ll eventually add.
6. Add your railings
The simplest and most secure way to add railings to your decking is to purchase these pre-made from a DIY store. Then you can simply attach the rails by drilling the corner posts into place.
7. Lay the deck boards
Begin laying your decking boards by working from the out edge, inwards. Mark out where you should cut your decking pieces and then saw them down. The two decking pieces that are at the edges will additionally require the cutting out of a section to account for the corner rail poles.
Continue inwards and screw each decking piece down onto the joist that’s immediately below. The layout of your decking pieces should be staggered so that they avoid a block pattern.
8. Fit the skirting panel
Skirting panels can be attached easily and simply by using pre-constructed lattice panels and a wire mesh staple gun attached to the back to stop any unsightly debris from collecting underneath your decking.
9. Consider adding a gate
A gate may be helpful if you have small children or pets whom you want to restrict access to; gates are available ready made from any good DIY store.
Image source: www.remodelinghouseideas.blogspot.co.uk
 Follow us @hirecentres