
-
Access Platform Hire
-
Scissor Lifts
-
 Skyjack 3219 - 7.8M Scissor Lift
-
Genie GS 2632 Scissor Lift - 7.9M Platform
-
Genie GS 2646 Scissor Lift - 9.9M Working Height
-
Skyjack 4632 - 11.75M Scissor Lift
-
Stabiliser/ Outrigger Foot Pads 300mm x 300mm 9t Capacity
-
BoSS X3X 5.2M Scissor Lift
-
Genie GS 4047 - 13.7M Scissor Lift
-
Scissor Lift Rough Terrain Diesel - S2755RT 8.1m (27ft) Platform
-
Scissor Lift - AS1413E 13.8m (45ft) Platform
-
JCPT2212DC 22m Large Scissor Lift
-
-
Boom Lifts
-
Niftylift 120T - 12M Trailer Mounted Cherry Picker
-
Niftylift 170 - 17M Trailer Mounted Boom Lift
-
Niftylift HR12 - 12M Self Propelled Boom Lift
-
Stabiliser/ Outrigger Foot Pads 300mm x 300mm 9t Capacity
-
Niftylift SD120T 4x4 - 12.65M Self Drive Platform
-
Niftylift HR15 4x4 - 15.7M Self Propelled Boom Lift
-
Niftylift HR17 Hybrid 4x4 - 17.2M Self Propelled Boom Lift
-
Niftylift HR21 4X4 - 20.8M Self Propelled Cherry Picker
-
Niftylift HR17E | 17.2m Self Propelled
-
- Spider Lifts
- Low Level Access Platforms
- Vertical Masts
-
Scissor Lifts
-
Access Tower & Support
-
Ladders & Steps
-
Ladder - Double 4.00 to 6.00 Metre
-
Ladder - Double 5.00 to 9.00 Metre
-
Ladder - Roof Ladder Extending 3.9 to 6.6 Metre
-
Ladder - Safety Foot
-
Ladder - Stand Off
-
Step Ladder - 6 Tread Fibreglass Steps 1.65m Open
-
Step Ladder - 10 Tread Fibreglass Steps 2.74m Open
-
Step Ladder - 6 Tread, 4ft 9" Open
-
Step Ladder - 10 Tread, Platform 8ft
-
Step Ladder - 12 Tread, Platform 9ft 7"
-
Ladder - Combi Ladder - 2.45 to 5.80m Extended
-
Ladder - Combi Ladder - 3.00 to 6.90m Extended
-
- Scaffold Towers & Podium Steps
- Trestles Boards & Supports
-
Ladders & Steps
-
Breaking & Drilling
-
Breakers
-
Breaker - Hydraulic
-
Impact Wrench - Hilti SIW 22A
-
SDS Hammer Drill - Hilti TE 6 36A
-
10 KG Combihammer TE 80-ATC
-
Light Demolition Hammer TE 500
-
Medium Demolition Hammer TE 700
-
Heavy Demolition Hammer TE 1000
-
Heavy Demolition Hammer TE 3000
-
Concrete Demolition Hammer - TE 2000-AVR
-
Hydraulic Breaker SB102
-
- Diamond Drilling
- Drills & Portable Milling Machines
- Cordless Drills and Rotary Hammers
-
Breakers
-
Cleaning & Floorcare
- Floor Cleaning
- Pressure Washer Hire & Patio Cleaners
- Vacuums & Dust Extractors
-
Compaction Equipment
- Rollers
- Compacting Plates
-
Concrete Equipment
-
Mixer - Concrete Mixer 4/3 Tip Up - 240v
-
Float - Big Blue Glider Float
-
Mixer - Concrete Mixer 4/3 Tip Up - 110v
-
Mixer - Concrete Mixer 4/3 Tip Up - Petrol
-
Float - Easy Float
-
Float - Power Float
-
Poker Vibrator - Petrol
-
Poker Vibrator - Electric
-
Beam Screed - Vibrating Screeder Unit
-
Beam Screed - Aluminium Beam Set
-
Pump - Submersible 50mm (2") c/w 5m Flexible Drive
-
Impact Wrench - Hilti SIW 22A
-
10 KG Combihammer TE 80-ATC
-
-
Cutting & Grinding
-
Power Cutter - 300mm (12") Petrol
-
Floor Saw - 450mm (18")
-
Saw - Masonry Sawbench 350mm (14") Petrol
-
Diamond Blade Hire & Sale
-
Block Splitter
-
Cordless Angle Grinder - Hilti AG125 22A
-
Cordless Angle Grinder - Hilti AG 150-A36
-
Diamond Power Cutter, Hilti DCH 300
-
Diamond Grinder DG 150 + DPC 120
-
Power Conditioner DPC 120
-
Angle Grinder AG 115-7D
-
Angle Grinder AG 125-15DB
-
Angle Grinder AG 230-24D
-


 Platform")
 Platform")


")
")
")
")
")


 c/w 5m Flexible Drive")
 Petrol")
")
 Petrol")


-
Decorating & Site Equipment
- Compressors
- Decorating Equipment
- Fencing & Barriers
- Hand Tools & Miscellaneous items
- Surveying & Measuring
- Tile Saws
- Dehumidifiers, Drying and Flood Restoration Equipment
- Diggers/ Dumpers/Trenchers
- Dust & Fume Extractors
- Floor Sanding Equipment
- Flooring & Surface Preparation Equipment Hire
-
Gardening and Landscaping
- Ground Clearance, Preparation & Fencing Equip.
- Lawncare
- Hedge and Tree Maintenance


 2m Section")


")

")
")


- Generator Hire
-
Heaters
- Heaters - Direct Fired Gas
- Heaters - Electric
- Heaters - Indirect Fired Gas & Oil
-
Hilti Hire
- Batteries/Chargers
-
Cordless Innovation
-
Cordless Hammer Drill Driver - Hilti SF 6-A22
-
Impact Driver - Hilti SID 4-A22
-
Impact Wrench - Hilti SIW 22A
-
Cordless Angle Grinder - Hilti AG125 22A
-
Cordless Reciprocating Saw - Hilti WSR 22-A
-
SDS Hammer Drill - Hilti TE 6 36A
-
Cordless Angle Grinder - Hilti AG 150-A36
-
Cordless Combihammer - Hilti TE 30 36A
-
Li-ion Battery - Hilti Battery 22v 5.2 Ah
-
Li-ion Battery - Hilti Battery 36V 5.2 Ah
-
Battery Charger - Hilti Charger 4/36-350 230v
-
- Cutting and Grinding
- Diamond Systems
- Direct Fastening
-
Drilling/Demolition
-
Cordless Hammer Drill Driver - Hilti SF 6-A22
-
Impact Driver - Hilti SID 4-A22
-
Impact Wrench - Hilti SIW 22A
-
SDS Hammer Drill - Hilti TE 6 36A
-
Cordless Combihammer - Hilti TE 30 36A
-
3KG Rotary Hammer TE7-C
-
4KG Combihammer TE 30
-
10 KG Combihammer TE 80-ATC
-
Light Demolition Hammer TE 500
-
Medium Demolition Hammer TE 700
-
Heavy Demolition Hammer TE 1000
-
Heavy Demolition Hammer TE 3000
-
Concrete Demolition Hammer - TE 2000-AVR
-
- Dust Extraction
- Rotating Lasers
- Sanders
-
Lifting, pulling
-
Cobra Reel/ Duct Rod
-
Mobile Gantry - 2 Tonne Lifting Capacity
-
Scaffold Hoist 150kg
-
Block & Tackle
-
Engine Hoist
-
Skates - Shifting Skates - 16 Tonne Capacity
-
Jack - Toe Jack 5000kg Capacity
-
Pallet Truck - 2.5 Tonne Capacity
-
Brick Basket
-
Genie Superlift SLA-10
-
Genie Superlift SLA-15
-
Genie Superlift SLA-25
-
Genie Superlift Fork Extensions
-
Panel Lift
-
-
Lighting/Power/Welding
-
Lights Cables & Distribution
-
Distribution Box - 63amp
-
RCD Circuit Breaker
-
Floodlight - 2 x 30w LED on Stand
-
Junction Box - 4 Way 110v
-
Light - Plasterers Light
-
Transformer - 3.3kva Power Tool
-
Transformer - 5.0kva Power Tool
-
Armoured Cable - 63amp
-
Distribution Box - 13amp Satellite
-
Distribution Box - 13amp Satellite Dimmer
-
Transformer - 3.0kva Continuous Vented
-
Extension Lead
-
Distribution Box - 32amp
-
Light - 30w LED Floodlight on Stand
-
- Welding Equipment
- Generator Hire
-
Lights Cables & Distribution
- Pumps & Plumbing
- Sanders & Saws


")
")
")


")


 Pump c/w 1 Length Hose + Clip")
 c/w 1 Length Hose + Clip")
")

 Full range
 Plant Sales
 Plant Hire
 Careers at Plantool
Find your nearest branch
Categories
- Access Platform Hire
- Access Tower & Support
- Breaking & Drilling
- Cleaning & Floorcare
- Concrete & Compaction Equipment
- Cutting & Grinding
- Decorating & Site Equipment
- Dehumidifiers, Drying and Flood Restoration Equipment
- Diggers/ Dumpers/Trenchers
- Dust & Fume Extractors
- Flooring & Surface Preparation Equipment Hire
- Gardening and Landscaping
- Heaters
- Hilti Hire
- Lifting, pulling
- Lighting/Power/Welding
- Pumps & Plumbing
- Sanders & Saws
- Full range
- Plant Sales
- Plant Hire
-
Powered Access Hire Locations
- Powered Access Hire Hinckley
- Powered Access Hire Wellingborough
- Powered Access Hire Rugby
- Powered Access Hire Leicester
- Powered Access Hire Coventry
- Powered Access Hire Northampton
- Powered Access Hire Solihull
- Powered Access Hire Redditch
- Powered Access Hire Market Harborough
- Powered Access Hire Birmingham
- Powered Access Hire Dudley
- Powered Access Hire Walsall
- Powered Access Hire Wolverhampton
- Powered Access Hire Peterborough
- Powered Access Hire Blaby
- Powered Access Hire Corby
- Powered Access Hire Leamington Spa
- Powered Access Hire Broughton Astley
- Powered Access Hire Exhall
- Powered Access Hire Rushden
- Powered Access Hire Wigston
- Powered Access Hire Bedworth
- Powered Access Hire Oadby
- Powered Access Hire Kenilworth
- Powered Access Hire Desborough
- Powered Access Hire Knowle
- Powered Access Hire Atherstone
- Powered Access Hire Enderby
- Powered Access Hire Southam
- Powered Access Hire Daventry
- Powered Access Hire Warwick
- Powered Access Hire Kettering
- Powered Access Hire Stratford-upon-Avon
- Powered Access Hire Lutterworth
- Powered Access Hire Nuneaton
- Powered Access Hire Irthlingborough
- Powered Access Hire Alcester
- Powered Access Hire Thrapston
- Powered Access Hire Coleshill
- Powered Access Hire Balsall Common
- Powered Access Hire Earls Barton
- Powered Access Hire Towcester
- Powered Access Hire Raunds
- Powered Access Hire Ibstock
- Powered Access Hire Studley
- Powered Access Hire Shipston on Stour
-
Access Tower & Support Hire Locations
- Access Tower & Support Hire Hinckley
- Access Tower & Support Hire Wellingborough
- Access Tower & Support Hire Rugby
- Access Tower & Support Hire Leicester
- Access Tower & Support Hire Coventry
- Access Tower & Support Hire Northampton
- Access Tower & Support Hire Solihull
- Access Tower & Support Hire Redditch
- Access Tower & Support Hire Market Harborough
- Access Tower & Support Hire Birmingham
- Access Tower & Support Hire Dudley
- Access Tower & Support Hire Walsall
- Access Tower & Support Hire Wolverhampton
- Access Tower & Support Hire Peterborough
- Access Tower & Support Hire Blaby
- Access Tower & Support Hire Corby
-
Plant Hire Locations
-
Concrete Crusher Hire Locations
- Concrete Crusher Hire Daventry
- Concrete Crusher Hire Warwick
- Concrete Crusher Hire Kettering
- Concrete Crusher Hire Stratford upon Avon
- Concrete Crusher Hire Lutterworth
- Concrete Crusher Hire Birmingham
- Concrete Crusher Hire Dudley
- Concrete Crusher Hire Walsall
- Concrete Crusher Hire Wolverhampton
- Concrete Crusher Hire Peterborough
- Concrete Crusher Hire Blaby
- Concrete Crusher Hire Corby
- Concrete Crusher Hire Leamington Spa
- Concrete Crusher Hire Broughton Astley
- Concrete Crusher Hire Exhall
- Concrete Crusher Hire Leicester
- Concrete Crusher Hire Coventry
- Concrete Crusher Hire Northampton
- Concrete Crusher Hire Solihull
- Concrete Crusher Hire Rugby
- Concrete Crusher Hire Hinckley
- Concrete Crusher Hire Redditch
- Concrete Crusher Hire Wellingborough
- Concrete Crusher Hire Market Harborough
- Concrete Crusher Hire Rushden
- Concrete Crusher Hire Wigston
- Concrete Crusher Hire Bedworth
- Concrete Crusher Hire Oadby
- Concrete Crusher Hire Kenilworth
- Concrete Crusher Hire Desborough
- Concrete Crusher Hire Knowle
- Concrete Crusher Hire Atherstone
- Concrete Crusher Hire Irthlingborough
- Concrete Crusher Hire Balsall Common
- Concrete Crusher Hire Enderby
- Concrete Crusher Hire Southam
- Concrete Crusher Hire Alcester
- Concrete Crusher Hire Thrapston
- Concrete Crusher Hire Coleshill
- Concrete Crusher Hire Earls Barton
- Concrete Crusher Hire Towcester
- Concrete Crusher Hire Raunds
- Concrete Crusher Hire Ibstock
- Concrete Crusher Hire Studley
- Concrete Crusher Hire Shipston on Stour
- Concrete Crusher Hire Meriden
- Concrete Crusher Hire Crick
- Concrete Crusher Hire Attleborough
- Concrete Crusher Hire Wollaston
- Concrete Crusher Hire Staverton
- Concrete Crusher Hire Lowick
- Concrete Crusher Hire West Bromwich
- Concrete Crusher Hire Loughborough
- Concrete Crusher Hire Stourbridge
- Concrete Crusher Hire Halesowen
- Concrete Crusher Hire Smethwick
- Concrete Crusher Hire Willenhall
- Concrete Crusher Hire Kingswinford
- Concrete Crusher Hire Swadlincote
- Concrete Crusher Hire Tipton
- Concrete Crusher Hire Wednesbury
- Concrete Crusher Hire Coalville
- Concrete Crusher Hire Rowley Regis
- Concrete Crusher Hire Brierley Hill
- Concrete Crusher Hire Melton Mowbray
- Concrete Crusher Hire Oldbury
- Concrete Crusher Hire Stamford
- Concrete Crusher Hire Brackley
- Concrete Crusher Hire Shepshed
- Concrete Crusher Hire Birstall
- Concrete Crusher Hire Wombourne
- Concrete Crusher Hire Oakham
- Concrete Crusher Hire Castle Donington
- Concrete Crusher Hire Oundle
- Concrete Crusher Hire Kegworth
- Concrete Crusher Hire Silverstone
-
Mini Digger Hire Locations
- Mini Digger Hire Hinckley
- Mini Digger Hire Wellingborough
- Mini Digger Hire Rugby
- Mini Digger Hire Coventry
- Mini Digger Hire Northampton
- Mini Digger Hire Leicester
- Mini Digger Hire Solihull
- Mini Digger Hire Market Harborough
- Mini Digger Hire Redditch
- Mini Digger Hire Birmingham
- Mini Digger Hire Peterborough
- Mini Digger Hire Walsall
- Mini Digger Hire Wolverhampton
- Mini Digger Hire Dudley
- Mini Digger Hire Leamington Spa
- Mini Digger Hire Broughton Astley
- Mini Digger Hire Exhall
- Mini Digger Hire Blaby
- Mini Digger Hire Corby
- Mini Digger Hire Coalville
- Mini Digger Hire Swadlincote
- Mini Digger Hire Loughborough
- Mini Digger Hire Rushden
- Mini Digger Hire Bedworth
- Mini Digger Hire Wigston
- Mini Digger Hire Oadby
- Mini Digger Hire Kenilworth
- Mini Digger Hire Irthlingborough
- Mini Digger Hire Atherstone
- Mini Digger Hire Desborough
- Mini Digger Hire Alcester
- Mini Digger Hire Thrapston
- Mini Digger Hire Crick
- Mini Digger Hire Earls Barton
- Mini Digger Hire Enderby
- Mini Digger Hire Balsall Common
- Mini Digger Hire Knowle
- Mini Digger Hire Southam
- Mini Digger Hire Meriden
- Mini Digger Hire Coleshill
- Mini Digger Hire Daventry
- Mini Digger Hire Warwick
- Mini Digger Hire Kettering
- Mini Digger Hire Stratford-upon-Avon
- Mini Digger Hire Lutterworth
- Mini Digger Hire Nuneaton
-
Dumper Hire Locations
- Dumper Hire Hinckley
- Dumper Hire Nuneaton
- Dumper Hire Warwick
- Dumper Hire Lutterworth
- Dumper Hire Daventry
- Dumper Hire Kettering
- Dumper Hire Stratford-Upon-Avon
- Dumper Hire Coventry
- Dumper Hire Dudley
- Dumper Hire Leicester
- Dumper Hire Market Harborough
- Dumper Hire Northampton
- Dumper Hire Peterborough
- Dumper Hire Redditch
- Dumper Hire Rugby
- Dumper Hire Solihull
- Dumper Hire Walsall
- Dumper Hire Wellingborough
- Dumper Hire Wolverhampton
- Dumper Hire Blaby
- Dumper Hire Broughton Astley
- Dumper Hire Corby
- Dumper Hire Exhall
- Dumper Hire Leamington Spa
- Dumper Hire Alcester
- Dumper Hire Atherstone
- Dumper Hire Balsall Common
- Dumper Hire Bedworth
- Dumper Hire Burton Latimer
- Dumper Hire Coleshill
- Dumper Hire Crick
- Dumper Hire Desborough
- Dumper Hire Earls Barton
- Dumper Hire Enderby
- Dumper Hire Irthlingborough
- Dumper Hire Kenilworth
- Dumper Hire Knowle
- Dumper Hire Meriden
- Dumper Hire Oadby
- Dumper Hire Rushden
- Dumper Hire Southam
- Dumper Hire Thrapston
- Dumper Hire Wigston
- Dumper Hire Attleborough
- Dumper Hire Ibstock
- Dumper Hire Lowick
- Dumper Hire Raunds
- Dumper Hire Shipston on Stour
- Dumper Hire Staverton
- Dumper Hire Studley
- Dumper Hire Towcester
- Dumper Hire Wollaston
- Dumper Hire Coalville
- Dumper Hire Halesowen
- Dumper Hire Kingswinford
- Dumper Hire Loughborough
- Dumper Hire Rowley Regis
- Dumper Hire Smethwick
- Dumper Hire Stourbridge
- Dumper Hire Swadlincote
- Dumper Hire Tipton
- Dumper Hire Wednesbury
- Dumper Hire West Bromwich
- Dumper Hire Willenhall
- Dumper Hire Birmingham
-
Concrete Crusher Hire Locations

A Guide to Sanding Hardwood Flooring
 Providing a rustic and homely look that is filled with quality and character, there is simply no substitute for having a hardwood floor in your home. Much easier to clean than carpet, it offers both practicality and a good look.
The beauty of hardwood flooring though is the fact that it is designed to last, unlike laminate or cheaper alternatives, this type of flooring can be sanded down and revitalised with relative ease. So whether you are looking to breathe new life into reclaimed flooring you have obtained, or you wish to transform flooring you already have, here we show you how sanding can strip away old paint and dirt and provide you with a fresh new look…
You will need:
- A dust mask
- Eye protection
- Gloves
- Masking tape
- A hammer
- A floor sanding machine - see are range here
- An edging sander
- A carpenter’s pencil
First Steps
Before you start up the sander, be sure to move any furniture, TVs, speakers, ornaments, fragile items and anything else from the floor. Once you have done this you will then need to start your preparations, this should include:
- Removing any loose nails, staples, screws and other unwanted fixings
- Fixing any loose or broken floor boards
- Filling in any small gaps or holes
- Removing any heavy dirt, grease or wax by hand
- Sweeping the floor clean
It’s crucial that you remove any loose nails, staples, screws or any other metallic fixtures from the floor. Failure to do this can be very dangerous and can result in sparks that create a fire hazard, in addition to this it can also tear the sanding sheets and damage the floor sander.
Although our machines are dust free, it is still wise to utilise the masking tape well and mask up any gaps or holes. This is good practise if you are sanding any areas by hand or are using a sander that isn’t dust free.
Method
- Ensure that the sanding sheets you are using are tightly fitted around the drum of the sanding machine to prevent slipping
- Working lengthways and starting against the wall at one end of the room, start the sander but do so by ensuring the drum is off of the floor. From here, slowly easy the drum to the floor and begin sanding. It’s important to sand with the grain.
- Move at a gradual pace and sand right down to the end of the room. Once you reach the end, lift the drum off of the floor, turn around and repeat the process on the next length of floor.
- After repeating this process, you will eventually find yourself against the wall on the opposite side of the room. Once you’re happy with the finish of the floor, it will now be time to use the edger to finish off the job.
- Unfortunately floor sanders will not sand right up to the skirting boards so you will need an edger to finish the job. Using the edger, complete the same sanding process as with the main sander in order to reach the edges, corners and any other hard to reach places in the room.
- In order to match up the sanding you have done with the floor sander and the edging sander, it may be that you need to ‘blend’ the sanding in. You can do this by using the edging sander in a semi-circular motion.
- To seal the floor and protect it from damage from knocks, stains or spills, you will want to varnish the floor. Before doing this however ensure that you have vacuumed the floor thoroughly to remove any wood dust or debris.
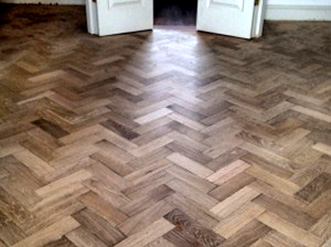
Parquet Floors
Unlike any other floorboards, parquet floors feature blocks with the grains going in opposite directions. While providing a great look, these blocks can be very difficult to sand.
For best results when sanding a floor, you should sand with the grain. By doing this you are sanding with the fibres of the wood, not against them, which results in the best possible finish. Sanding against the grain however means you are tearing the wood’s fibres and stripping away the wood much faster.
When sanding a parquet floor, this becomes a problem. On some of the blocks you will be sanding with the grain, whilst at the same time on the other blocks you will be sanding against the grain.
To remedy this you can you use the straight and across method with an ordinary floor sander. This means ensuring that each of the blocks are being sanded with an equal degree of pressure and that the drum of the sander is never only sanding one block at a time. This can get difficult; however our Trio Finishing Sander presents a better solution for parquet floors.
Designed to be versatile, the Trio Finishing Sander features three sanding disks, meaning the floor isn’t just being sanded in one direction and won’t leave any scratch marks.
Things to consider
- Only sand the floor as much as you need to and choose the grit levels of your sanding sheets wisely. Choosing a very coarse sanding sheet and over sanding a floor will not only make the job take much longer, it will also reduce the life of your floor
- With the previous point in mind, be sure to test sand an area of your floor with a fine grit sanding sheet first. If this is enough to remove any dirt, paint or scratches that were previously on the floor then this grade sanding sheet will be sufficient and there will be no need to go coarser.
- If the flooring has recently been laid or has been left without heating, it’s best to leave it a few weeks before you begin sanding – this will give the wood time to dry out and return to its normal level of moisture
- Using a carpenter’s pencil to mark on the floor any areas where there are exposed nails, deep scratches or holes, by doing this you will be aware of areas where you will need to change the grit of the sanding sheets you are using.
November 19, 2014
 Follow us @hirecentres